Categories
printing

Epson ET 8550 black horizontal bars on 10×15 photo on high quality print (AI)

HI (Human intelligence)

Question: epson et 8550 black horizontal bars on photo on high quality print in last part on 10x15 photo premium glossy. what can i do?

Picture (not for AI):

Solution

1.1.2026: The thick paper setting actually worked. And it seems the black bars (or what is called tail strikes) are gone. However, in the future bending the paper against the u shape might also suffice. Let’s see.

AI: Artificial Intelligence: Google Gemini 3 Pro Preview

This is a known issue with the Epson ET-8550 (and similar EcoTank photo printers) when printing on glossy media. The black horizontal bars that appear specifically at the end of the print are caused by “Head Strike” or “Tail Strike.”

— Toll,… dass sagst Du mir jetzt…, jetzt hab ich so lange recherchiert nach dem besten Drucker… ๐Ÿ˜…

As the 10x15cm (4×6″) paper leaves the main rollers near the end of the print, the “tail” of the photo tends to flip or curl upward slightly. Because the print head is very close to the paper for high-quality printing, it physically strikes the wet surface, smearing black ink across the bottom of your photo.

Here are the specific steps to fix this:

1. Enable “Thick Paper” Setting (Most Effective)

Even though standard glossy photo paper isn’t “cardstock,” telling the printer it is “thick” raises the print head slightly, increasing the gap between the nozzle and the paper.

  • On the Printer Screen: Go to Settings > Printer Settings > Thick Paper and turn it ON.
  • In the Driver (PC/Mac): Look for “Extension Settings” or “Extended Settings” in the Maintenance or Utility tab and check “Thick Paper and Envelopes.”
  • Note: This setting often resets when you turn the printer off, so you may need to check it before printing again.

2. Flatten Your Paper (De-Curl)

Glossy paper often has a slight natural curl, especially 10×15 sizes coming from a pack.[1]

  • Check your paper stack.[1][2][3][4][5] If it curves upward (like a smile U), the edges will lift and hit the print head.
  • Gently bend the stack in the opposite direction to flatten it out before loading it. The paper should be perfectly flat.

3. Use the Rear Paper Feeder

If you are currently using the front cassette tray, switch to the Rear Paper Feeder.

  • The front cassette forces the paper to make a 180-degree turn, which can induce a curl (“memory curl”) in the paper right before it hits the print head.
  • The rear feed has a straighter path, keeping the paper flatter and reducing the chance of the tail popping up at the end.

4. Clean the Paper Path (Roller Maintenance)

If you have already had several of these misprints, there is likely wet ink on the output rollers or the bottom of the print head.

  • Run the Paper Guide Cleaning utility from the Maintenance menu.
  • If the bars persist, you may need to manually clean the “ribs” (plastic guides) inside the printer with a lint-free cloth and a little window cleaner (ensure the printer is unplugged) to remove ink buildup that is transferring to your new prints.

Summary of the Fix:
Turn ON the Thick Paper setting and try feeding the paper from the Rear Feeder.[6] This combination solves the problem for almost all ET-8550 users.

Sources help

  1. reddit.com
  2. epson.com
  3. epson.biz
  4. epson.com
  5. epson.com
  6. redrivercatalog.com
Google Search Suggestions
Categories
Coding Home Automation

Running LLaMA-omni2 to replace home assistant voice assistants to control Roborock S7

TL;DR: I can run some basic inference and tts, but there is no proper pipeline or any integration available with home assistant…, so I’ll next go back to rhasspy.

In my last post I setup my Roborock S7 (aka Rocki) with home assistant and setup a voice assistant with the voice preview device and google gemini models.

In this post, I want to document my exploration into running a proper speech-speech-omni model and control Rocki. First step, get the model to run and somehow be able to input speech.

Following: https://github.com/ictnlp/LLaMA-Omni2

git clone https://github.com/ictnlp/LLaMA-Omni2
cd LLaMA-Omni2
# sidetrack to install anaconda: go to https://repo.anaconda.com/archive/
# i selected https://repo.anaconda.com/archive/Anaconda3-2025.06-1-Linux-x86_64.sh
# I run linux in WSL on windows
conda create -n llama-omni2 python=3.10
conda activate llama-omni2
pip install -e .
# now run python shell
python
> import whisper
> model = whisper.load_model("large-v3", download_root="models/speech_encoder/")
> exit()
huggingface-cli download --resume-download ICTNLP/cosy2_decoder --local-dir models/cosy2_decoder
model_name=LLaMA-Omni2-7B
huggingface-cli download --resume-download ICTNLP/$model_name --local-dir models/$model_name
# it's downloading a lot of large files...
# maybe the 7B is a little big for my RTX3060 with 12GB VRAM, and also might be slow, so for testing, let's get the smallest 0.5B model. 
# And who knows how this will work, like does whisper run in parallel, then blocking VRAM?
model_name=LLaMA-Omni2-0.5B
huggingface-cli download --resume-download ICTNLP/$model_name --local-dir models/$model_name

# FIX 1: now somehow we need matcha-tts I ran into errors and doing this allows demo to run
pip install matcha-tts
# FIX 2: install ffmpeg (source: https://gist.github.com/ScottJWalter/eab4f534fa2fc9eb51278768fd229d70)
sudo add-apt-repository ppa:mc3man/trusty-media
sudo apt-get update
sudo apt-get dist-upgrade
sudo apt-get install ffmpeg

# open 3 terminals, make sure to activate the conda environment in each
# 1)
python -m omni_speech.serve.controller --host 0.0.0.0 --port 10000

# 2)
python -m llama_omni2.serve.gradio_web_server --controller http://localhost:10000 --port 8000 --vocoder-dir models/cosy2_decoder
# this has problems: jsonable_encoder stuff, gemini recommended to: 
pip install --upgrade pydantic
pip install --upgrade fastapi
# problem persists...

# 3)
model_name=LLaMA-Omni2-0.5B
python -m llama_omni2.serve.model_worker --host 0.0.0.0 --controller http://localhost:10000 --port 40000 --worker http://localhost:40000 --model-path models/$model_name --model-name $model_name

Ok, it didn’t work out of the box. ๐Ÿ˜

Trying the local inference python script. This works!
I adapted the questions, recorded my own audio and you get a response:
“Why is the sky blue?”

###questions.json
[
    {
        "id": "helpful_base_0",
        "conversation": [
            {
                "from": "human",
				"speech": "examples/wav/whyskyblue.wav"
            }
        ]
    }
]
##

output_dir=examples/$model_name
mkdir -p $output_dir

python llama_omni2/inference/run_llama_omni2.py \
    --model_path models/$model_name \
    --question_file examples/questions.json \
    --answer_file $output_dir/answers.jsonl \
    --temperature 0 \
    --s2s

python llama_omni2/inference/run_cosy2_decoder.py \
    --input-path $output_dir/answers.jsonl \
    --output-dir $output_dir/wav \
    --lang en

I adapted it with my own question: Why is the sky blue.

run_llama_omni2.py takes ~18.6s

run_cose2_decoder.py takes ~14.1s

Result:

So: I think I need some more out of the box approach here. Maybe go back to Rhasspy?!

Categories
Coding Home Automation Server

home assistant voice assistant and Roborock integration

TL;DR: roborock s7 and home assistant work quite well with voice assistant.

So today I wanted to try to find a replacement for home asssitant voice assistant. I successfully setup a voice assistant within home assistant. However, the performance of this voice assistant was not, what I was hoping for. My main scenario was to start my vacuum with home assistant.

Rocki and home assistant

So how do I do that…? Roborock S6 integration with home assistant was easy. However, in order to start room clean with one click, you have to create boolean helper variables for each and a script, that correlates these variables to a room id. Then, based on wich boolean is activated will activate the room clean:

Note here, for the inexperienced home assistant user, you CAN edit everything in code and not in the GUI.

sequence:
  - variables:
      room_configs:
        - name: living_room
          boolean: input_boolean.rocki_room_living_room
          id: 16
        - name: kitchen
          boolean: input_boolean.rocki_room_kitchen
          id: 17
        - name: storeroom
          boolean: input_boolean.rocki_room_storeroom
          id: 19
        - name: dining_room
          boolean: input_boolean.rocki_room_dining_room
          id: 20
        - name: foodstorage
          boolean: input_boolean.rocki_room_foodstorage
          id: 21
        - name: office
          boolean: input_boolean.rocki_room_office
          id: 23
        - name: hallway
          boolean: input_boolean.rocki_room_hallway
          id: 24
  - variables:
      selected_rooms: |-
        {% set ns = namespace(rooms=[]) %}
        {% for room in room_configs %}
          {% if is_state(room.boolean, 'on') %}
            {% set ns.rooms = ns.rooms + [room.id] %}
          {% endif %}
        {% endfor %}
        {{ ns.rooms }}         
  - data:
      command: app_segment_clean
      params:
        - segments: |
            {{selected_rooms}}
    target:
      entity_id: vacuum.rocki
    action: vacuum.send_command
alias: Selective Cleaning
description: ""

So, how does it work? I activate each boolean on my dashboard and then tell it to clean:

I was really happy here ๐Ÿ™‚ And after a few trials, I can safely say, my flat has never been vacuumed so thoroughly!

Kudos to: https://www.youtube.com/watch?v=xe7xjnGqYiU

Voice Assistant

I’m a happy owner of the Voice Preview Edition (https://www.home-assistant.io/voice-pe/) Starting with the voice assistant was not THAT successful. I run home assistant in docker, that might make it a little more complicated.

The integrated home assistant voice assistant (did nothing, and I ended up deleting it)

I also tried the home assistant cloud, and I would have been happy on supporting them monthly, if it gave me a working voice assistant.

Next I tried Local-LLM via hacs. This seemed promising, but neither the llama.cpp on my server, nor an ollama instance on my PC worked properly.

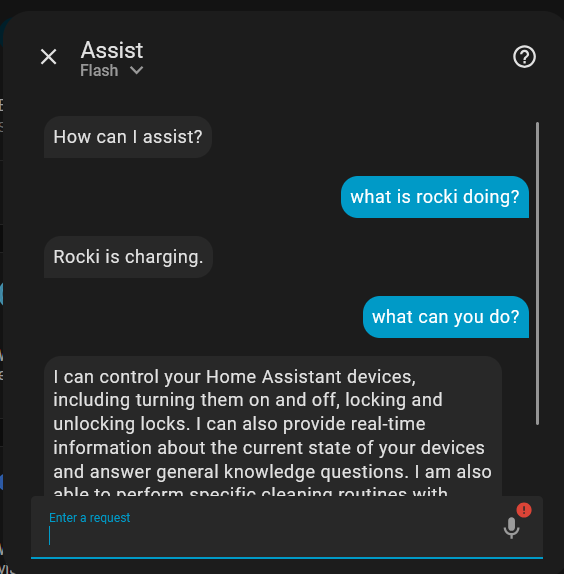
What did work, was integrate it with google-gemini. I just used all google services.

And it worked:

BUT: In order now to start my cleaning i have to issue a voice command like this:

Ok nabu! Activate the hallway, storeroom, kitchen and dining room, then start cleaning

This command mimics how I would do it manually via the dashboard, activate booleans and then initiate cleaning.

Another problem: my nabu device doesn’t engage in a more nuanced dialogue, I cannot chain or anything. Like:

Ok nabu! What time is ti?
>>> It is …
When was the last cleaning?
>>> Last cleaning was …
Ok, so please clean kitchen and dining room again
>>> Starting cleaning…, do you want me to create an automation that rocki cleans the kitchen every Wednesday
No thanks.

OK, so the last part may be over the top, but still, that’s my goal.
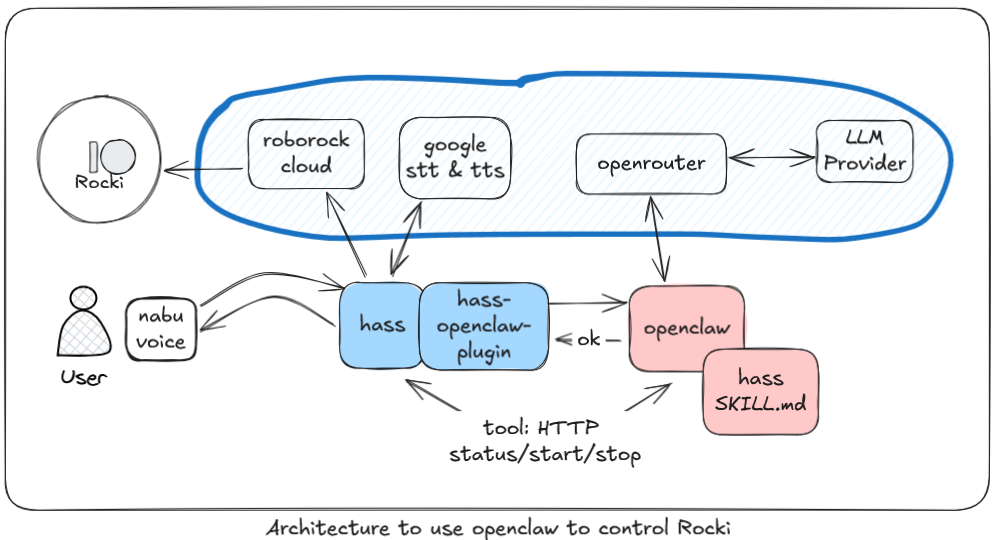
So what was the hacker reaction to this, I figured, I might need to program everything from scratch and do it myself! ๐Ÿ˜…

Let’s see!

Categories
run free Thoughts

Vorfuss, Mittelfuss, Ballen – Wie gehen beim Wandern?

Begriffsklรคrung:

  • Gehen: Spazieren gehen. In meinem Sprachgebrauch auch oft als “laufen” bezeichnen. “Wir sind nach Hause gelaufen” (alemannisch)
  • Laufen: Joggen, manchmal wรผrde ich das auch als rennen bezeichnen. Im englischen eher “to run”. Eigentlich klar, einen Marathon laufen. Geschwindigkeit: Marathongeschwindigkeit.
  • Rennen: Schneller als laufen, aber vielleicht noch nicht ganz ein Sprint, oder doch?
  • Sprint: Maximalgeschwindigkeit
  • Schreiten: Tรคnzer, auf der Bรผhne, ein langsames Schreiten.

Wieso?

2022 (oder so), habe ich “Born to run” von Christoph McDougall gelesen. Ich war fasziniert von der Tatsache, dass erstens, der Mensch ein Ausdauerjรคger war, und zweitens es mรถglich ist, mit Sandalen 40, 100 oder noch mehr Kilometer zu laufen. Nicht, dass ich ab diesem Zeitpunkt nur noch mit Sandalen rumgelaufen bin.

Nun ist 2025, ich habe das zweite Buch, “Born to Run 2 – Trainingsplan” beschafft. Einmal ganz durchgelesen, und nun mรถchte ich den Trainingsplan umsetzen (das allerdings ist eine Geschichte fรผr einen anderen Beitrag).

Jedenfalls frage ich mich, wenn es fรผr die Lauftechnik so wichtig ist mit dem Vorfuss aufzusetzen, bzw. die hohe Schrittfrequenz zu halten, wie wandere ich dann? Und soll ich in Zukunft รผberhaupt noch wandern?

Manch einer meint ja, dass Vorfuss, oder Vorfuss-Mittelfuss auch beim Gehen verwendet werden sollte. Grund sei, mรถglichst wenig Belastung auf die Ferse auszuรผben.

Nach der Lektรผre dieses Artikels, wo Vorfussgang und Fersengang (aka Ballengang) beschrieben werden, und diesen zwei Youtube Videos ist fรผr mich der Groschen aber Gefallen. Beim Gehen (und somit auch beim Wandern) lรคsst man das Bein schlicht nach vorne pendeln, und kommt dadurch automatisch mit der Ferse auf. Dann verlagert man das Gewicht nach vorne, rollt automatisch รผber den Fuss ab, und lรคsst das nรคchste Bein nach vorne Pendeln. Fรผr mich ist das am Natรผrlichsten.

Links:

Categories
Server

draft: socks5 proxy on linux server vps

socks5 proxy on your vps let’s you route traffic from your pc, over the server. This can be useful, for example, if you want to use some services that are only available in one country, but you’re in another. You don’t need to get some fancy VPN service, just use a socks5 proxy.

Even better, by using a firefox extension like FoxyProxy, you can enable the proxy only on select pages, like ARD, ZDF, SRF, ORF or Amazon Prime.

socks5 proxy on vps

Use docker compose to manage your services running on your server

Configure a username and a password. I do this, so that I avoid other people using my proxy. Since A LOT of port scanning is happening on an internet server, I’m assuming, some might find, that under a specific port, I’m running a socks5 proxy. If it weren’t protected, everybody could use my proxy and route traffic through it. Not what I want.

Configure Firewall

FoxyProxy

Categories
Server

Configure proxy for PS4 to use socks5

PS4 cannot use a socks5 proxy. See a couple of sources.

However, you can create a local proxy, that in turn tunnels the traffic then to your socks5 proxy. Now you can use the desired app (looking at you, amazon) on the ps4.

Use gost: (go simple tunnel)

vi gost-service.sh

>>> content
#!/bin/bash

gost -L :8888 -F socks5://username:password@ip-address:port
>>>

#enable firewall?! sudo?
ufw allow 8888
ufw reload

Test the tunnel

./gost-service
# you should see output, or working tunnel

# try with this (ifconfig.me returns the ip it sees)
curl ifconfig.me
# now with proxy
curl -x localhost:8888 ifconfig.me
# best, also try it from another pc, so you can check firewall
curl -x yourlocalserver:8888 ifconfig.me

Now you’re basically ready, to configure the PS4, or any other client.

However, to make it more persistent, let’s create a service and start. Use systemctl to create the service.

sudo vi /lib/systemd/system/gost.service

>>> content
[Unit]
Description=
After=network.target

[Service]
Type=simple
ExecStart=/path/to/file.sh

[Install]
WantedBy=multi-user.target

Start the service

sudo systemctl enable gost.service
sudo systemctl start gost.service

Configure PS4

Settings -> Network -> WiFi/Cable? -> Manual -> Select, all default until proxy: Use Proxy -> configure, host and port

Done ๐ŸŽ‰

Categories
Good Reads

I may be wrong – Bjรถrn Natthiko Lindeblad

๐Ÿšงdraft๐Ÿšง

Most interesting “quotes” or passages.

  • When they were waiting near the port to catch a ferry. Since they didn’t and couldn’t handle money, they just needed to wait, until someone buys them a ticket. The philiosophical lesson behind, to trust in the world, and in humanity, to provide and help each other.
  • When the author how he thinks the general philosophy in Thailand when there is a group of people, and another person joins. People there seem to be happy, that there is one more person. His own culture was more like, oh no, we don’t want one more person.

Ok, these passages need some proper citation and more ellaboration. However this is my first good read entry, and I just wanted to tell, I read this book in 2024.

Changelog:

  • Resetting publish date to 2024.
Categories
Desktop

Logitech G Pro X Lightspeed DTS – how to actually enable Surround Sound (spatial sound) Windows 10

So, if you are like me and you just bought the Logitech G Pro X Lightspeed Headset with DTS and read somewhere, that it should have Surround Sound, you might have thought: yeah, that is nice. I need a new headset, so I might have an advantage if I actually hear, where the

You think, what-the-fuck, it sounds an awful lot like stereo. You find out, that it actually is! ๐Ÿ™‚

Then ok, wow, there is the option for Spatial Sound (aka Surround sound) and you think, yeah lets enable it.

Bam! It doesn’t work!

  • Downlaod, install and start the DTS-X app.
  • Make sure codec is loaded
  • Go to Sound Settings
  • Enable Surround Sound

Update 2025: Windows 11 is out, now it’s not even possible for me to easily configure it with the trick before. Surround option just disabled. Well, I gave up on Windows, with Windows 11. I only have it because, from time to time I play Fortnite. I couldn’t even be bothered anymore.

Update April 2025: I’m using Kubuntu as my main driver now…, no surround there anyhow. It might be possible somehow, but I couldn’t be bothered. Didn’t really sound like surround anyhow. Also, I have to say, I never really heared the surroundyness of the headphones. You can’t compare it AT ALL, to proper surround sound from like a speaker setup. There you hear all directions, on the headphone, not really.
Funny enough, Kubuntu doesn’t allow me to have my taskbar on the left, but here I cut them some slack ๐Ÿ˜›

Categories
Server

Setup your Linux Server

State: draft

Note: This shall serve as a collection of all relevant commands, so that one might save some time searching the world wide web.

USER and OS: Configure your own user and setup daily OS upgrades.

# Change root pw:
passwd
# add personal user 
adduser USERNAME
# add user to sudo group
adduser USERNAME sudo
# install unattended upgrades package...
sudo apt-get update
sudo apt-get install unattended-upgrades
# ... and enable
sudo dpkg-reconfigure --priority=low unattended-upgrades

FIREWALL: Install firewall and setup. You may want to change SSH port. Make sure to first allow ssh (so that you will not be excluded from your own server), allow the new port and once connected successfully, deny ssh.

Categories
Server

Strato Linux VPS (Linux-V10) and caprover – no happy end

TL;DR: caprover does NOT run on Strato Linux VServer (e.g. Linux V10). Think about nginx reverse-proxy, certbot and docker-compose instead.

The whole idea of running my own server was to install caprover and then be able to easliy create and push web applications. However, it did not work as intended…

This is a note to everybody that tries to install caprover, a self hosted PaaS (something like heroku) on a Linux VPS hosted on strato: It does not work.

The Strato VPS Linux servers, e.g. Linux V10, seem to be docker containers themselves (This might be the reason, why one can rent such a server at the low prize of 5 EUR/month). Caprover however would need to be installed on a non-dockerized host machine. Inside a docker container, the swarm and networking capabilities seem to be restricted.